Tuesday, March 26, 2013

Painted Mirror-Girls Bedroom

Hi Everyone,

So as I mentioned in the previous post, this mirror was way to dark for her bedroom so I painted it a gray to match the general color scheme of her room.
The After
Here was the before..
I
I used Miss Mustardseed Milk paint and distressed a little around the edges and finished off with Ann Sloan Wax.


Now off to do more DIY projects and finish school projects.

Thanks so much for reading this blog and have a lovely day!

XOXO
SK

I linked up with
TheRusticPigMade in a Day


Liz Marie Blog
www.missmustardseed.com

Sunday, March 24, 2013

Vintage, Girlie Bedroom-Part 1

Hi Everyone,

 Sorry for the long absence. Between school functions, Spring Break and preparing for Montessori Night this Mom hasn't had much time to dedicate to the blog. So today I started thinking of Jordan's big girl bedroom. I recently, infact way to fast, sold her crib. I have yet to purchase her bed, so for now she is sleeping in the guest bedroom. I recently spotted a headboard which I am thinking I will reupholster and paint, but haven't yet decided...

So this is what I know for sure will be in her bedroom. This vintage wing chair, which I reupholstered here in a cream linen fabric.


This little distressed footstool with handmade pillow.  Please see this post of my distressed furniture piece.
  This dresser, which I will probably leave untouched...


I think these are the fabrics and colors I will use in the room.  I love all neutrals, white, cream, gray but also loving the yellow and gray combination.  By the way, these chevron/ikat fabric pillows are available in my Etsy Store.

So at this point I have the basic color scheme/style and most of the furniture pieces.  I am still undecided about the headboard, paint on walls and rug. All fun stuff to mull over.  Please check in with me tomorrow for the painted mirror reveal, using Miss Mustard paint.

As always, Thanks for reading this blog.  Hope your weekend was wonderful and your Spring Break.

XOXO

I linked up with

SK
Liz Marie Blog
www.missmustardseed.com

Saturday, March 9, 2013

Adding Small Touches at Home

Hi Everyone,

Finally I had a chance to add a few special touches to our home.  These little projects took about 45min-1hr each to complete and I think, add a little more personality to our home.

Added Dimmers~ In our family room and I think in most new homes and renovated ones the main level and larger spaces have can lights throughout.  I love the light they create and lets face it, lighting is huge in interiors, however not such a big fan of the bright light that comes with several of these lights in a room..so I added dimmers.  A pretty easy project indeed and love the less intense light it creates.

Added wallpaper in two areas~ A little niche that needed something extra.  Surprisingly, I found this wallpaper at Lowes at the bargain price of $30.00, can't beat that.


Finally completed the pinch pleat panels for the family room.  Tutorial on how I sew pinch pleat panels to follow.

Glad I was able to check these items off the list.  Easy projects, inexpensive and add little touches of the personality I like in our home.

Thanks so much for reading my blog.  Enjoy your weekend...I will be getting ready for a trip and playing with my lovelies.

XOXO
SK


Too Much Time On My Hands
It's Overflowing

Saturday, March 2, 2013

DIY Upholstered Wing Chair

Hi Everyone,

I recently walked through a thrift/secondhand store looking for treasures for my daughters big girl room and saw these wing chairs sitting in a corner, obviously in the store for quite some time, since they had been marked down several times.  The chairs were in pretty good condition, except for the fabric which has been completely worn through.  The chair was hand crafted and made of solid wood.  So I picked it up and thought why not I can reupholster this chair and give it a completely custom look.
The before Chair

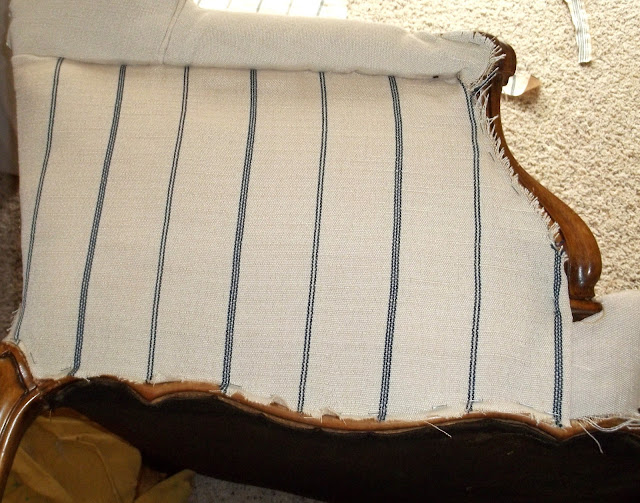
Ripping off the fabric and making sure I took pics of process
I pulled all the yucky fabric off, tacks and all, probably the worst part of the job for me...it really was so dirty!

Now came the job of putting it all back together.  I took photos of each step when pulling off the fabric, so I could reassemble in the correct order and saved the dirty fabric for templates.

I ripped off the back first, so I knew this would be the last piece to assemble

I threw away all the old batting and replaced with new.  This is a view of the side of the chair.
So I started with the arm of the chair, wrapping batting around and pulling the fabric over the arm and tucking it under completely concealing the staples.  I used a combination of upholstery tacks, staples and also hot glue.
The side piece, staples on the outer edge and fabric pulled tight below the arm piece
Saved all the pieces and used as a template

I added piping by stapling separately around the wing and also the back piece and pulling the fabric tightly around all the batting.

For the finishing touch I added the trim with hot glue and a nailhead detail. So here is the finished product and I would have to say it is a comfy chair with all my favorite fabrics, colors and details.


Honestly, I would have to say this was not my favorite decor project, super yucky for one and quite time consuming.  I will have to say though, it was interesting taking it apart and understanding the process of putting it all back together again.  So I hope this inspires you all to reupholster a chair with good bones that just needs a little TLC.

Over the weekend Dad and the girls had a little snow fun!  They built a huge fort to protect the girlies from Dads wicked aim with the snow balls and also the biggest snow man ever!


Hope you all had a lovely weekend and thanks for checking out my blog.

XOXO
SK

I linked up with 


http://designdecortuesday.blogspot.com
http://missmustardseed.com
 http://www.jenniferrizzo.com
 www.craftyscrappyhappy.net


Sassy Little Lady
It's Overflowing
Too Much Time On My Hands


toastie studio >
PJH Designs
Lil’ Mrs. Tori
House on the Way
TheRusticPig
Liz Marie Blog
TDC Before and After