Several months ago I made these Chevron/Ikat Pillows for my daughter's bedroom, but shortly after completely her bedroom I sold those fun pillows. The pillows gave the room a shot of color and although I naturally gravitate toward neutral colors the room felt remiss without that small pop. So, the other day I made my biweekly trip to Hobby Lobby with coupons in hand and I thought for sure I would buy that exact same fabric that was previously in her room, however I immediately noticed this fun fabric. What a great jolt of color it would be in her bedroom! I purchased about a yard and a half along with some cute ribbon details and put it to the side til I knew I would have a moment to complete. I did not have 18X18 down inserts, but did rummage around and I found a bolster insert and thought it might be a great opportunity for me to share with you all, if interested, how I sew boslter pillows. So here we go~
Supplies Needed~
1.) Piping. This particular piping was premade, but piping with coordinating fabric would give the bolster a pretty custom look.
2.)Decorative Trim. Unfortunately I did not have enough of this cute trim and had to scrap my idea. I was short 3 inches. Lesson learned measure around your bolster insert not just once, but twice.
3.) Ribbon. I purchased a spool of each of the ribbons. You will not be needing much of these ribbon details.
4.) Ribbon for End Pieces.
5.) Tape Measure.
6.) Scissors.
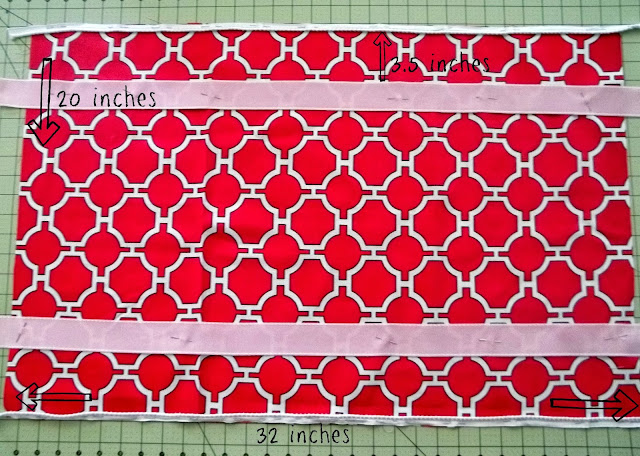
Accurately cut a rectangular piece. My bolster measured 20 inches x 32inches. Measure from end to end and then wrap your fabric around the pillow form to determine the length.
Place the ribbon about 3 and half inches away from the ends and securely pin in place. Also pin the piping to the end piece. Notice the placement of the piping and ribbon on the fabric.
Now pin the end pieces to your fabric. My end pieces meaured 4.5in x 32 in. I measured the radius of the bolster to determine the width.
Stitch an opening, just a hair larger than the width of the ribbon and thread the ribbon through the opening. Make sure to double hem to give the pillow a nice clean look and prevent fraying.. Stitch the ends together, but be careful not to stitch the opening closed.

Now pull the ribbon and tie a bow at the ends to secure. Its as easy as that, really! I inserted a zipper, but this is not nessasary since the pillow will easily slip over the insert through the end before the ribbon pulls the fabric together.
Now you will probably see way too many pics of the completed pillow in her room:)


I really love that just one interesting, colorful pillow can make all the difference in making a room complete and unique. It doesn't take much time, energy or money and can be changed on a whim~the beauty of throw pillows.
As always Thanks for Reading this blog.
If you like what you see you can follow me through PINTEREST, FACEBOOK, or HOMETALK.
Have a Fabulous Day
XOXO,
SK
Linking up with~ http://www.attagirlsays.com/, http://myuncommonsliceofsuburbia.com/, http://tatertotsandjello.com/, http://www.jenniferrizzo.com/


I ADORE these pillows! Fabulous tutorial Im so making these,Thanks!
ReplyDeleteAwesome Deidre! Thanks for the comment.
DeleteWhat a clever idea...I love bolster pillows! And the fabric is perfect!
ReplyDeleteHappy day to you!
karianne
Thanks KariAnne!
Delete